Recovering RAW Files from SD Card or USB Drive
Quick Navi
- SD card raw file system recovery
- Recover raw files from sd card or usb drive
- How to format raw sd card fat32/exfat without losing data
SD/USB RAW file system VS raw files
What is raw file system: A raw file system is a basic, unformatted data storage structure on a storage device like a hard drive or flash drive. It lacks the file structure and organization of a typical file system, making it inaccessible to users without specialized software.
A raw file system is not created by Windows or any operating system. Instead, it occurs when the file system structure on a storage device becomes corrupted or damaged. When Windows encounters a drive with a raw file system, it means that it cannot recognize or access the data on the drive due to this corruption. Users typically need to repair the file system or recover data from such drives using specialized software or professional services.
Also read: what is raw file system or sd card raw file system recovery
What are raw files: Raw files on a storage drive, like an SD card or USB flash drive, typically refer to unprocessed or uncompressed image files captured by digital cameras. These files contain all the data captured by the camera's sensor without any in-camera processing or compression.
Raw files offer greater flexibility for post-processing and retain more image detail but require specialized software to view and edit, as they vary in format depending on the camera manufacturer (e.g., .NEF for Nikon, .CR2 for Canon). In the context of file systems, "raw" often means unformatted or corrupted data, which is different from raw image files.
Related info
Free RAW SD/USB Recovery Software [raw sd or raw files recovery]
Free tool iCare Recovery Free can help recover files from raw sd card or when sd card raw images were deleted, formatted, inaccessible etc.
When SD card raw images become casualties of unforeseen circumstances, iCare Recovery Free rises to the occasion, leveraging its comprehensive capabilities to meticulously scan, identify, and restore the missing files. It transcends the boundaries of data loss, breathing life back into seemingly lost memories and critical information.
Here are the steps to recover sd card raw image files or perform raw sd card recovery with the software.
Step1. ![]() Download iCare Recovery Free, connect your sd card to PC via a card reader, open this recovery tool, and select a recovery option to go.
Download iCare Recovery Free, connect your sd card to PC via a card reader, open this recovery tool, and select a recovery option to go.
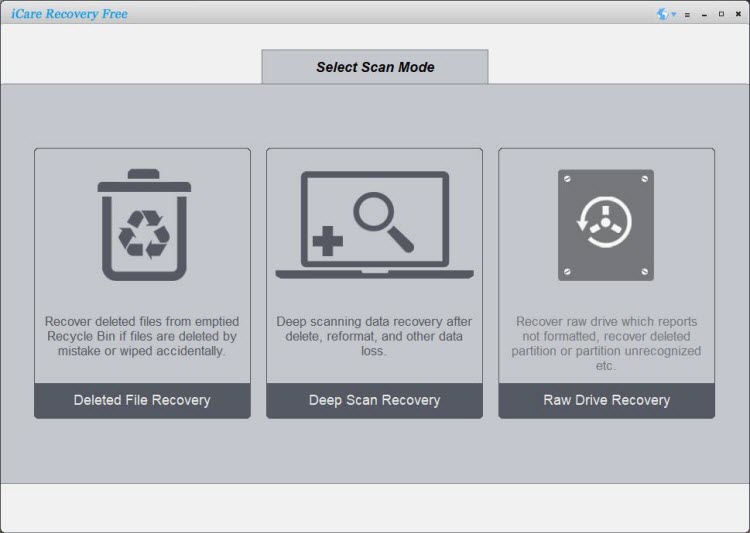
Select a Recovery Mode:
- In the main interface, you'll see several recovery modes. For recovering raw images from an SD card, you can start with the "Deep Scan Recovery" mode, which is suitable for retrieving lost or deleted files.
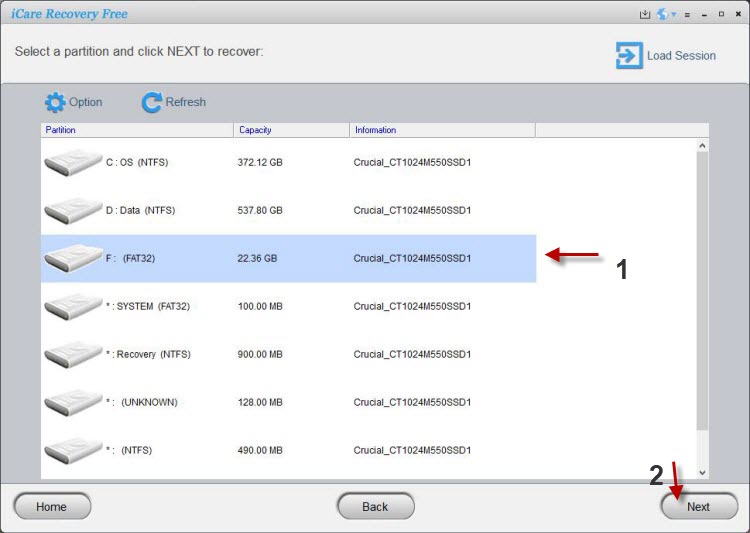
Step2. Choose the SD Card:
- From the list of available drives and storage devices, select the SD card you want to recover data from.
Step3. Preview and Select Files:
- Once the scanning is complete, you'll see a list of recoverable files. You can preview these files to confirm their integrity.
- Select the raw image files you want to recover. You can usually filter the results by file type to make it easier to find your raw images.
This following photo displays this software found images after scanning that users may select and then click Recover button to save them.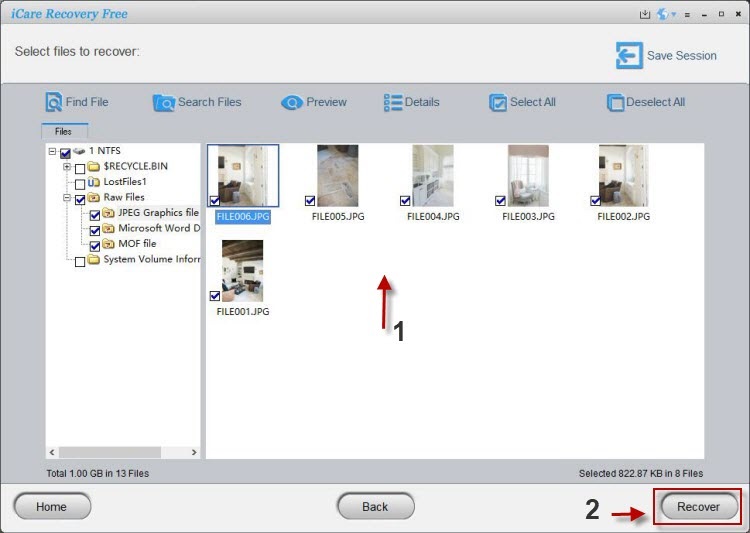
Step4. Recover the Raw Images:
- After selecting the desired raw image files, click the "Recover" button.
- Choose a location on your computer where you want to save the recovered files. Avoid saving them back to the same SD card to prevent overwriting data.
RAW SD Card Format
Once the data have been retrieved from the raw sd card, then here are several ways to fix the RAW SD Card FAT32/EXFAT.
Also read: how to format raw sd card fat32/exfat
Method 1: Using Windows Disk Management (Windows)
- Insert the SD Card: Insert the raw SD card into your computer's card reader or SD card slot.
- Open Disk Management:
Press Win + X and select "Disk Management" from the menu (Windows 10/11).
Or right-click on "Computer" (or "This PC" in newer versions) and choose "Manage," then select "Disk Management." Or you may type diskmgmt.msc in the Run window to get it started.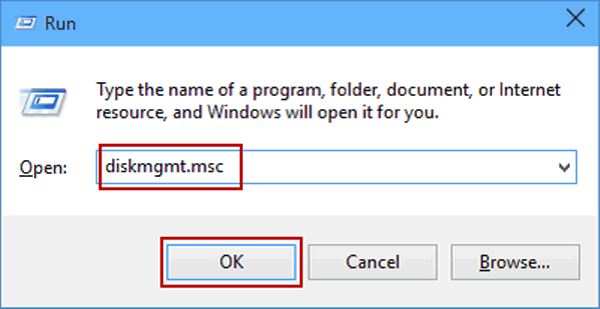
- Locate the SD Card:
In the lower section of the Disk Management window, you should see a list of drives, including your SD card.
It may show as "Unknown" or "Not Initialized.", if it displays as RAW, you may right click it, and format it (Step 6 dispalys the steps, and if it cannot be formatted, you need to go through step 4 and 5.) - Initialize the SD Card: (Step 4 to 5 can be omitted if you can directly go with step 6)
Right-click on the SD card and select "Initialize Disk."
Follow the on-screen instructions to choose the partition style (usually GPT for larger SD cards or MBR for smaller ones). - Create a New Partition: (Step 4 to 5 can be omitted if you can directly go with step 6)
Right-click on the unallocated space of the SD card and select "New Simple Volume."
Follow the wizard to create a new partition.
Choose the file system as either FAT32 or exFAT. - Format the SD Card:
Right-click on the newly created partition and select "Format."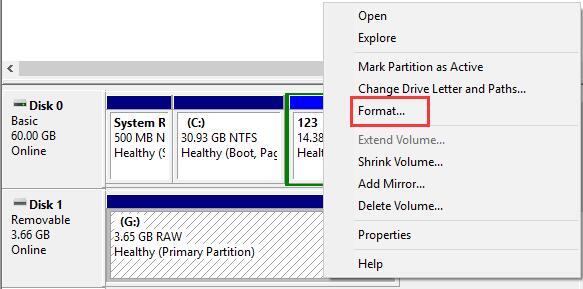
Choose either FAT32 or exFAT as the file system.
Set a volume label (optional).
Click "OK" to start the formatting process.
Complete the Formatting.
Wait for the formatting process to complete. Once finished, your SD card will be formatted with the selected file system (FAT32 or exFAT).
If the above steps not working, go with the following simple ones:
- Open Disk Management, insert sd card
- Right click raw sd card -> Format
- Set the file system to be fat32 or ntfs in the format window and confirm the formatting
Still failed with the above steps? see the following link.
Also read: sd card cannot be formatted [6 fixes]
Method 2: Using Command Prompt (Windows)
- Insert the SD Card: Insert the raw SD card into your computer's card reader or SD card slot.
- Open Command Prompt:
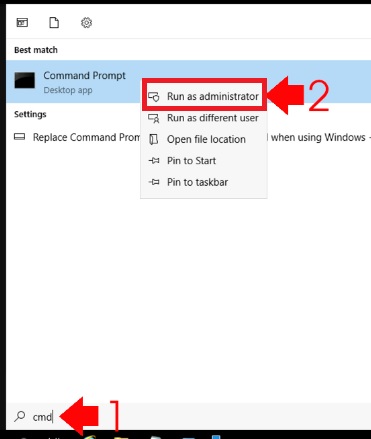
Press Win + X and select "Windows Terminal" or "Command Prompt" with administrative privileges.
- Identify the SD Card:
Type diskpart and press Enter.
Then, type list disk and press Enter to see a list of available disks.
Select the SD Card: - Type select disk X (replace "X" with the number corresponding to your SD card).
- Clean the SD Card:
Type clean and press Enter. This removes all partitions and data on the SD card.
- Create a New Partition and Format:
Type create partition primary and press Enter.
Type format fs=FAT32 quick (for FAT32) or format fs=exFAT quick (for exFAT) and press Enter.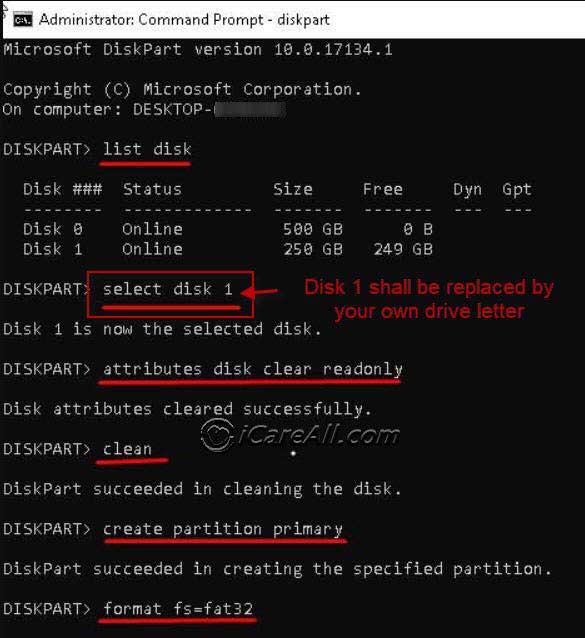
- Assign a Drive Letter (Optional):
Type assign letter=X (replace "X" with an available drive letter) and press Enter.
Exit DiskPart.
Type exit and press Enter.
Your SD card should now be formatted with the chosen file system (FAT32 or exFAT). You can access it through File Explorer.
Cannot format sd card exfat? Try the following free tool to get the sd card formatted to exfat/fat32.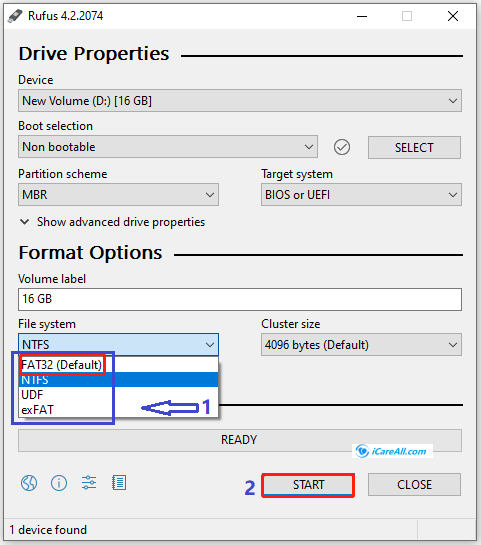
Also read: 7 free sd card formatters
Raw image/video types created by different cameras
Different cameras produce raw image files in various formats, which can vary depending on the manufacturer and model of the camera. Here are some common raw image types produced by different camera manufacturers as of my last knowledge update in September 2021:
- Canon: Canon cameras typically produce raw files with the CR2 file extension. Some older models may use the CRW format.
- Nikon: Nikon cameras generate raw files with the NEF (Nikon Electronic Format) extension. There are also variants like NRW for certain compact cameras.
- Sony: Sony cameras create raw files with the ARW extension.
- Fujifilm: Fujifilm cameras produce raw files with the RAF (Raw FUJI) extension.
- Panasonic: Panasonic cameras use the RW2 format for raw images.
- Olympus: Olympus cameras typically create raw files with the ORF (Olympus Raw Format) extension.
- Pentax: Pentax cameras generate raw files with the DNG (Digital Negative) or PEF (Pentax Electronic File) extension.
- Leica: Leica cameras often use the DNG format, which is also widely compatible with various software.
- Phase One: Phase One digital backs produce raw files with the IIQ (Phase One RAW) format.
- Hasselblad: Hasselblad cameras create raw files with the 3FR extension.
- Samsung: Samsung cameras used the SRW format for their raw files.
- Sigma: Sigma cameras generate raw files with the X3F extension.
- RED: RED cameras produce raw files with the R3D format, which is primarily used in the film and video industry.
- Blackmagic Design: Blackmagic cameras create raw files with the BRAW (Blackmagic RAW) format, designed for professional video production.
- DJI: Some DJI drones and cameras produce raw files with the DNG format.
It's worth noting that some cameras allow users to choose between different raw formats or compression levels to suit their preferences or workflow requirements. Additionally, new camera models may introduce updated raw formats or improvements in existing ones, so it's a good idea to check the camera's manual or manufacturer's website for the latest information on supported raw formats.
RAW video files on sd card
Just as with raw image formats, different cameras and video cameras also produce raw video formats that can vary depending on the manufacturer and model. These raw video formats are typically used in professional video production and post-production workflows due to their high-quality and flexibility. Here are some common raw video types created by different cameras and video cameras:
- REDCODE RAW (R3D): RED cameras, such as the RED DSMC2 and RED Komodo, record video in the proprietary R3D format. REDCODE RAW is known for its high image quality and flexibility in post-production.
- Blackmagic RAW (BRAW): Blackmagic Design cameras, like the URSA Mini Pro and Pocket Cinema Camera series, use the BRAW format. BRAW is a compressed raw format designed for efficient storage and post-production flexibility.
- ARRIRAW: ARRI cameras, including the ALEXA LF and Mini LF, capture video in the ARRI RAW format. ARRI is known for its high-end cinema cameras, and ARRIRAW offers excellent image quality and post-production control.
- Canon Cinema RAW (CRM): Some Canon cinema cameras, like the Canon C300 Mark III, record in the CRM format, which is a proprietary raw format by Canon.
- Sony RAW (X-OCN): Certain Sony cameras, such as the Sony VENICE, can record in the X-OCN (eXtended Tonal Range Original Camera Negative) format, which is a high-quality raw format.
- Panasonic V-RAW: Panasonic's cinema cameras, like the Panasonic EVA1, use the V-RAW format for raw video recording.
- DNG Video: Some cameras, including select models from Digital Bolex and Magic Lantern-enabled Canon DSLRs, can capture raw video in the Digital Negative (DNG) format, which is also used for raw images.
- CinemaDNG: CinemaDNG is an open standard raw video format used by a variety of cameras and digital film recorders. It's not tied to a specific manufacturer and is often used in post-production workflows.
- ProRes RAW: While not a camera-specific format, ProRes RAW is a raw video format developed by Apple and is supported by various cameras when using compatible external recorders. Cameras like the Nikon Z6 and Z7, for example, can output ProRes RAW.
- CineForm RAW: CineForm RAW is a format developed by GoPro and is used in some professional cameras and recorders for raw video capture.
It's important to note that raw video formats can vary not only by manufacturer but also by camera model and firmware version. Additionally, compatibility with these formats often depends on the recording media and external recorders used. When working with raw video, it's essential to have the necessary software and hardware to handle and process the raw footage effectively in post-production.
GoPro Video RAW Files
GoPro cameras do not natively support a traditional raw video format like some high-end cinema cameras. Instead, GoPro cameras primarily record video in compressed formats like H.264 or H.265 (HEVC) and save them as MP4 or MOV files. These formats are suitable for most users and offer a good balance between video quality and file size.
However, GoPro does offer a high-quality video recording mode called "ProTune." ProTune allows for greater control over certain aspects of video capture, such as exposure, color, and sharpness. While ProTune provides more flexibility in post-production compared to the standard video modes, it does not produce traditional raw video files.
Related Articles
- RAW sd card won't format
- Micro sdhc card is unformatted - What can you do when a micro sdhc card says unformatted problem?
- Force format raw sd card