External Hard Drive RAW File System [Windows 10/MAC] 6 fixes
The external hdd/ssd suddenly became raw and Windows 10 said you need to format before you can use it? This may happen when an external hard drive or internal hard disk partition has logical or physical damages and then turned raw in file system.
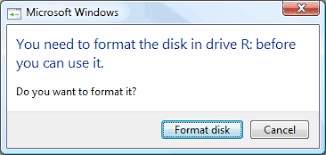 Disk raw needs formatting when you try to access the drive.
![]() Quick fix -> If there is no important data on this RAW hard drive, you can simply format the external disk from RAW file system to NTFS/fat32/exfat. Or continue reading the ways to recover raw hdd/ssd without losing data.
Quick fix -> If there is no important data on this RAW hard drive, you can simply format the external disk from RAW file system to NTFS/fat32/exfat. Or continue reading the ways to recover raw hdd/ssd without losing data.
Why did my hard drive file system suddenly turned raw? hard drive changed from ntfs to raw?

A hard disk or an external hdd/ssd file system can turn RAW due to various reasons such as:
- file system corruption,
- partition table issues,
- improper system shutdowns,
- virus or malware infections,
- bad sectors on the disk,
- or disk failure.
When an internal or portable hard disk becomes RAW, it means that the operating system cannot recognize the file system format on the disk, resulting in inaccessible data. It is important to address this issue promptly to recover data from the RAW disk at first and then potentially fix the problem by converting it back to a healthy file system format like NTFS or FAT32.
6 Ways to recover raw hard drive, including without formatting
When a hard disk becomes raw, it means that the file system has become corrupted or damaged. Repairing a raw hard disk can be challenging, but here are eight working methods to try: (You may ignore the first method if there were no important files on the disk.)
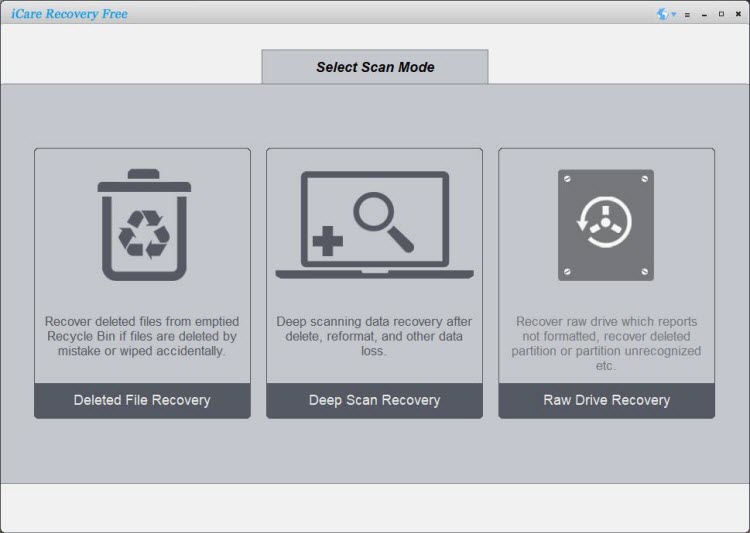
#1 Repair raw hard drive without losing data
Free tool iCare Data Recovery Free can help restore files from inaccessible disks, follow these steps:
- Download and Install iCare Data Recovery Free: Visit the official iCare Recovery website https://www.icare-recovery.com/data-recovery-free.html, double-click on the downloaded file and follow the on-screen instructions to install it on your computer.
- Launch iCare Data Recovery Free: Once the installation is complete, launch the software by double-clicking on its desktop shortcut or finding it in the Start menu.
- Choose a Recovery Mode: iCare Data Recovery Free offers various recovery modes, such as Deleted File Recovery, Deep Scan Recovery, Lost Partition Recovery, etc. Select the appropriate recovery mode based on your situation. For a raw HDD, it is recommended to start with the "Deep Scan Recovery" mode.
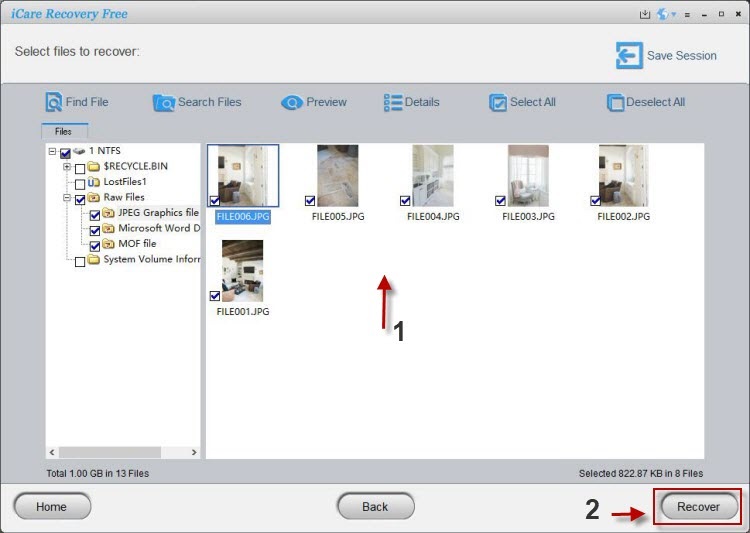
- Select the Raw HDD: Connect the raw HDD to your computer. Make sure it is properly recognized by the system. In iCare Data Recovery Free, you should see a list of available drives. Select the raw HDD from which you want to recover files.
- Scan the Raw HDD: After selecting the recovery mode, click on the "Next" or "Scan" button to start the scanning process. The software will now scan the raw HDD thoroughly to locate and analyze the lost files.
- Save found data on another disk: It's important to save found files from the raw disk to another disk to avoid data permanet overwritting.
Note: It's important to avoid writing new data to the raw HDD or using it for any other purpose during the recovery process to prevent further data loss or overwriting of recoverable files.
Video: How to run raw recovery
#2 Run CHKDSK command to repair raw hard drive
To run the CHKDSK command to repair a raw hard drive, follow these steps:
- Open Command Prompt: Press the Windows key, type "cmd," and click on the "Command Prompt" app to open it as an administrator.
- Identify the raw hard drive: Type "diskpart" in the Command Prompt and press Enter. In the new diskpart window, type "list volume" and press Enter. Note the drive letter associated with the raw hard drive you want to repair.
- Run CHKDSK: In the Command Prompt, type the following command and press Enter:
chkdsk h: /f
Replace "h" with the drive letter of the raw hard drive you noted earlier.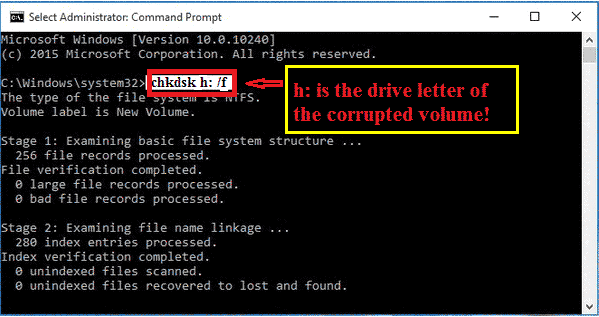
Or you may go with the following orders:
- list disk
- select disk *(replace* with your raw disk number)
- chkdsk /f
- exit if the above chkdsk command finished.
- Allow the scan and repair process to complete: CHKDSK will begin scanning and repairing the file system errors on the raw hard drive. This process may take some time depending on the size and condition of the drive. It will attempt to fix any errors it finds.
- Review the results: Once the CHKDSK process is complete, Command Prompt will display a summary of the scan results. It will indicate if any issues were found and repaired. Pay attention to any error messages or warnings displayed.
- Safely eject the raw hard drive: If the scan and repair process completed successfully, you can now safely eject the raw hard drive from your computer.
If the above cmd does not perform a raw disk repairing, you may use the following chkdsk command to have a trial.
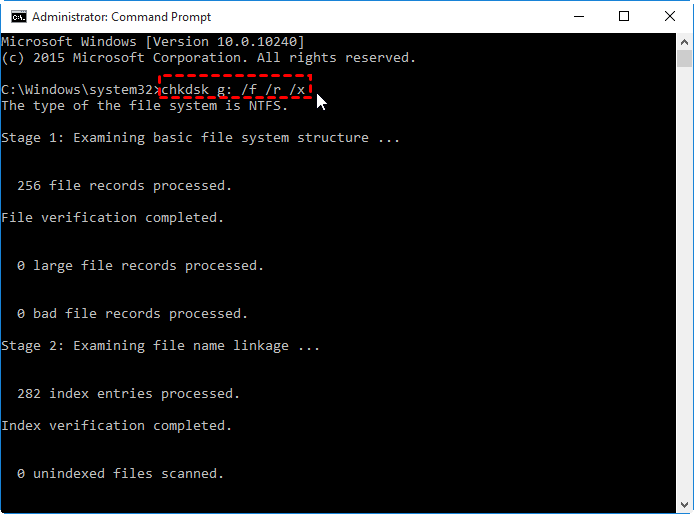 (Replace g: with your disk drive letter and a :, such as chkdsk h: /f /r /x)
Remember, running CHKDSK can help repair file system errors on a raw hard drive, but it does not guarantee a successful recovery of all data(You need to carry out a data recovery in the Fix#1). It's important to have a backup of your important files before attempting any repairs. If the CHKDSK command fails to fix the raw hard drive or you encounter any further issues, consider seeking professional help from a data recovery service or a computer repair specialist.
Chkdsk may fail on raw disk recovery
it's true that running the "chkdsk" command may fail when a disk has turned raw. The "chkdsk" command is primarily designed to check and fix issues with file systems like NTFS and FAT. When a disk becomes raw, it means that it doesn't have a recognized file system or the file system is corrupted.
In such cases, running "chkdsk" alone may not be sufficient to recover the disk or resolve the raw file system issue. However, you can try some alternative methods to recover files from a raw disk:
-
Use Data Recovery Software: As mentioned earlier, you can utilize specialized data recovery software like iCare Data Recovery Free (as discussed in the previous response) or other reputable data recovery tools.
-
Professional Data Recovery Services: If the data on the raw disk is critical or if you're unable to recover it using software solutions, you may consider contacting professional data recovery services. These services have advanced tools and expertise to deal with complex data loss situations, including raw disks.
#3 Fix raw disk without formatting by changing its drive letter
Changing the drive letter of a raw disk can sometimes be a workaround to fix the issue without formatting. When a disk becomes raw, it usually means that the file system is corrupted or missing. By changing the drive letter, you are essentially reassigning a new identifier to the disk, which might help bypass the raw state and regain access to the data.
To perform this method, follow these steps:
- Right-click on "My Computer" or "This PC" and select "Manage." This will open the Computer Management window. (Windows 7). For Windows 10 or 11, you may type 'partition' in search column, hover on 'Create and format hard disk partitions', and then open.

- In the Computer Management window, click on "Disk Management" under the Storage section.
- Locate the raw disk from the list of available disks. It should be labeled as "RAW" and might not have a drive letter assigned.
- Right-click on the raw disk and select "Change Drive Letter and Paths."
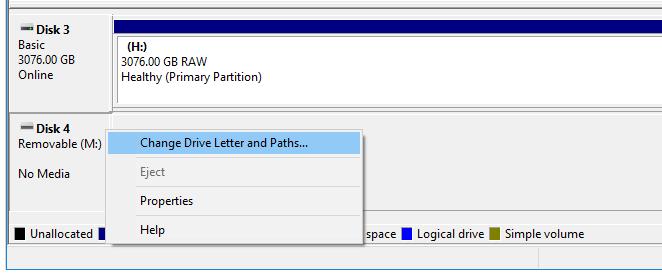
- Click on "Change" and select a new drive letter that is not currently in use.
- Click "OK" to confirm the drive letter change.
By assigning a new drive letter, the system attempts to remap the disk, allowing you to access it with the new identifier. If successful, you should be able to view the disk in File Explorer and access your data. However, it's important to note that this method may not always work, especially if the raw state is caused by severe corruption or physical damage to the disk. In such cases, data recovery software or professional services may be required to recover the files.
#4 Repair raw hdd/ssd using error-checking in Windows 11/10/7
To repair a raw HDD or SSD using error-checking in Windows, follow these steps:
- Connect the raw HDD or SSD to your computer.
- Open File Explorer and locate the raw disk.
- Right-click on the raw disk and select "Properties."
- In the Properties window, go to the "Tools" tab.
- Under the "Error checking" section, click on "Check" or "Check now."
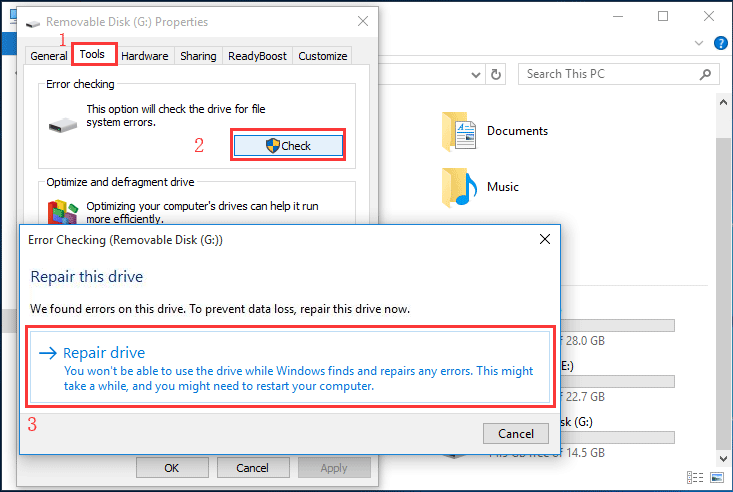
- Check the box that says "Automatically fix file system errors."
- Optionally, you can also check the box for "Scan for and attempt recovery of bad sectors."
- Click on "Start" to begin the error-checking process.
Windows will now scan the raw disk, attempt to fix any file system errors, and recover bad sectors if selected. This process may take some time depending on the size and condition of the disk. Once the error-checking process completes, you should have a repaired file system on the disk, and it may no longer be in a raw state.
#5 Format raw hard disk under Disk Management
To format a raw hard disk using Disk Management in Windows, follow these steps:
- Connect the raw hard disk to your computer.
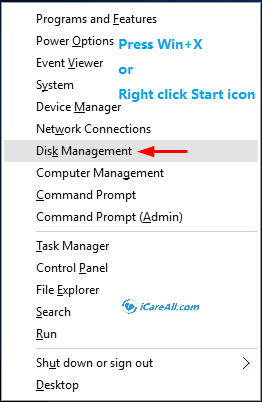
- Open Disk Management by right-clicking on "My Computer" or "This PC" and selecting "Manage" in Windows 7, In the Computer Management window, click on "Disk Management" under the Storage section.
- Or press Win+X on your keyboard to show the start menu on Windows 10/11, and then click Disk Management.
- Locate the raw hard disk in the list of available disks. It should be labeled as "RAW" and might not have a drive letter assigned.
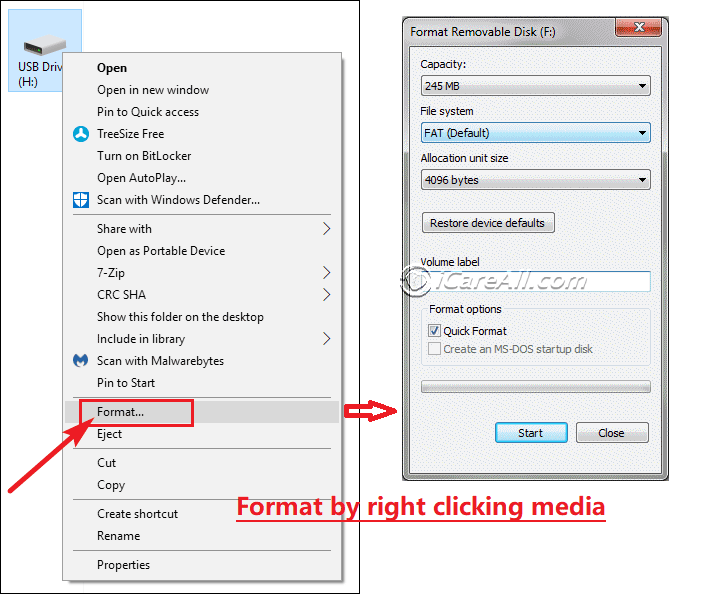
- Right-click on the raw hard disk and select "Format."
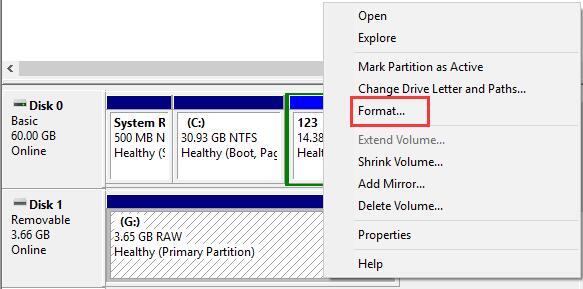
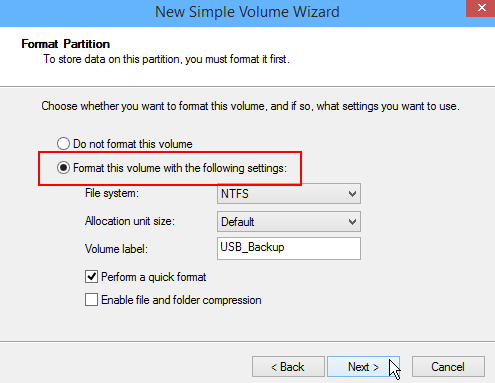
- Configure the format settings such as File System (e.g., NTFS), Allocation Unit Size, and Volume Label.
- Check the box for "Perform a quick format" if you want a faster format process.
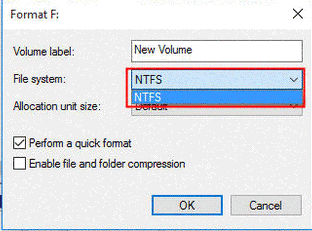
- Click "OK" to start the formatting process. A warning message will appear, confirming that all data on the disk will be erased.
- Confirm the format operation by clicking "OK" again.
Possible failures and fixes:
When disk management cannot format the raw disk due to various kinds of possible causes, it may report: The format did not complete successfully, or Windows was unable to complete the format.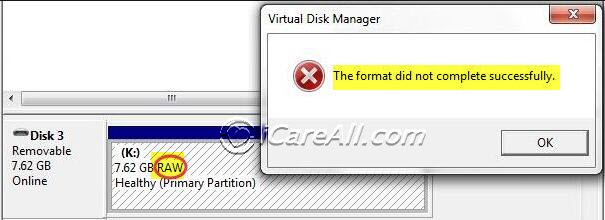
To solve these raw disk format failure, you may follow these steps:
- Right click the raw drive in Disk Management, and then Delete volume
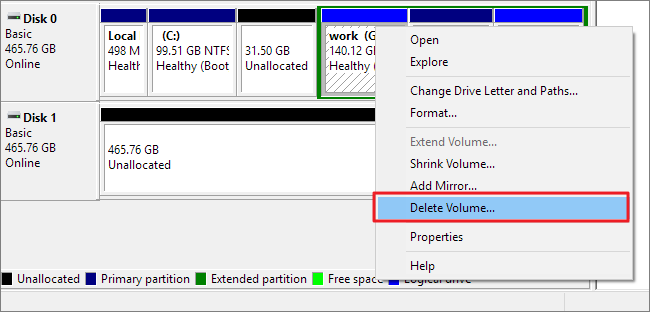
- Right click the disk in Disk Management again, and then Create new volume
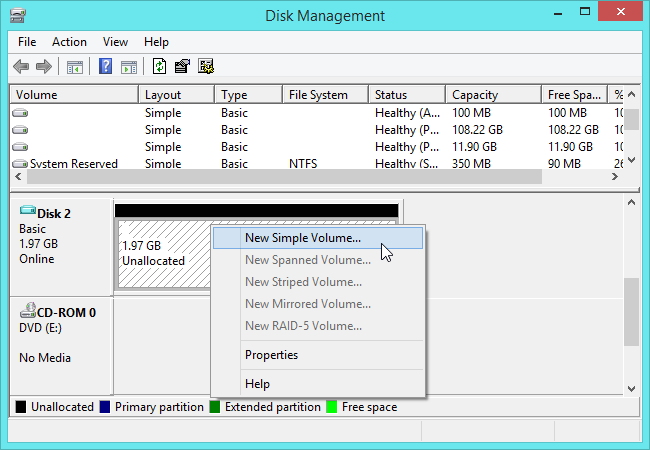
- Format the volume in the new volume wizard (File system, allocation unit size, volume label can be set as default)
Windows will now format the raw hard disk according to the specified settings. The process may take some time depending on the size of the disk. Once formatting is complete, the hard disk will have a recognized file system, and it will no longer be in a raw state.
Also read: Windows cannot format the disk
#6 Fix raw hard drive on MAC
To fix a raw hard drive on a Mac using Disk Utility, follow these steps:
- Connect the raw hard drive to your Mac.
- Launch "Disk Utility" by going to "Applications" > "Utilities" and opening "Disk Utility."
- In the Disk Utility window, you will see a list of available drives and volumes. Locate the raw hard drive in the left-hand sidebar.
- Select the raw hard drive from the list. Be careful not to select any of the existing volumes or partitions on the drive.
- Click on the "Erase" button at the top of the Disk Utility window.
- In the Erase dialog, choose the desired file system format (e.g., APFS, Mac OS Extended) for the drive.
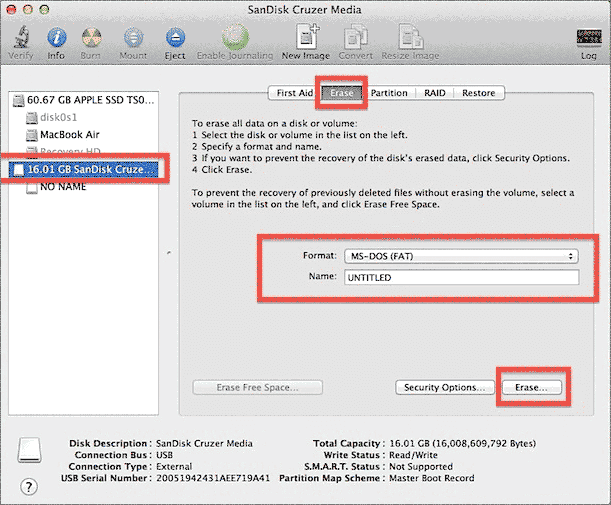
- Give the drive a name and configure other formatting options if needed.
- Double-check that you have selected the correct raw hard drive and that you have backed up any important data from it.
- Click on the "Erase" button to initiate the formatting process. A warning message will appear, confirming that all data on the drive will be erased.
- Confirm the erase operation by clicking "Erase" again.
Disk Utility will now format the raw hard drive according to the specified settings. The process may take some time depending on the size of the drive. Once formatting is complete, the hard drive will have a recognized file system, and it will no longer be in a raw state.
FAQs
1, Would it delete all files if I change external hard drive from raw to ntfs?
Answer: YES. It would delete all data on the raw drive if you want to change it to ntfs. The safer way is to restore files from raw drive at first, and then you may safely get the raw partition formatted to ntfs.
2, Format raw disk ntfs/fat32 in disk management
Disk raw needs formatting when you try to access the drive.
![]() Note: formatting would erase all data from raw disk.
Note: formatting would erase all data from raw disk.
However, if you have some very important files on the external hard drive which shows RAW file system, you might be very frustrated because formatting will erase all data. Then, is it possible to repair the RAW drive error? The answer is yes! You just need to perform data recovery first of all before formatting the external hard drive from RAW to NTFS.
Video - raw file system recovery without data loss
3, GPT Disk Partition Turned RAW
Answer: No matter it's a raw gpt disk or raw mbr disk (disk over 2TB or under), you may use the above methods to repair the raw hard drives.
Users That Run into External HDD RAW Format Error
Many users have encounter the RAW drive error on their external hard drive or other device, but somebody still do not know the correct solution. If you meet the similar problem below, you can free download iCare Data Recovery for file recovery:
"Hello guys! I want to look for an external hard drive software to restore files because my 500GB external disk shows RAW file system and has 0 byte space. So can anybody recommend useful software to help me out of the situation?"
"I received message CHKDSK is not available for RAW drives when I attempted to fix error on my external hard drive. I realized that my external HDD changes to RAW format and now I cannot open the RAW disk. What to do next to fix the error with all data back?"
"I have some precious pictures on my external HDD, but Windows system does not allow me to access the external because it says the disk has RAW file system. Is there a way to extract files off RAW external hard drive?"
"Please help me out of the RAW problem because I want to get back my data. My 2TB external hard drive says RAW drive error when I check its Properties. Why does it shows RAW file system? Can I format the external HDD from RAW to NTFS without losing data with command prompt?"
The Bottom Line
You might feel it unbelievable but it is true that all data remains intact on its original place when your external hard drive says RAW file system. This is the reason why you can use iCare Data Recovery to get back deleted files from external HDD that has RAW.
![]() Also read: how to recover data from raw drive
Also read: how to recover data from raw drive
Last updated on June 20, 2026
Related Articles