Disk 1 No Media - Fix Disk * No Media with Diskpart CMD
Background
Disk 1 no media diskpart or disk 0 no media 0 bytes diskpart are related phrases that users may encounter the error when they use diskpart command to make changes on their usb disk/flash or internal hard drive however it says 'Disk * no media' error and the partition would not show up too.
There is no media in the device mostly came up with the disk no media error in the command line diskpart.
This diskpart no media errors may happen to many disks when they are corrupted
- Seagate disk 1 no media, seagate external hard drive no media 0 bytes (internal hard disk or Seagate usb removable disk no media and the 1 or 0 or 2 is just the lable that is listed in your computer as the device list)
- WD external disk no media diskpart (WD external hard drive reported disk 1 no media by diskpart)
- Samsung external disk 1 no media 0 bytes
- Other brands of hard disks that mostly happened to external usb drives that has disk 1no media error, or disk 0 no media 0 bytes, or disk 2 no media 0 bytes determined by how the list was listed in your computer
Quick jump: usb/hard drive no media fixings with 5 free ways
Here is a photo that shows Microsoft diskpart is telling disk 2 no media 0b when you type 'list disk' in the command line. If you type 'select disk 2', it can be selected without problem, however any change on the selected disk/partition on the disk 2 may lead to error: There is no media in the device.
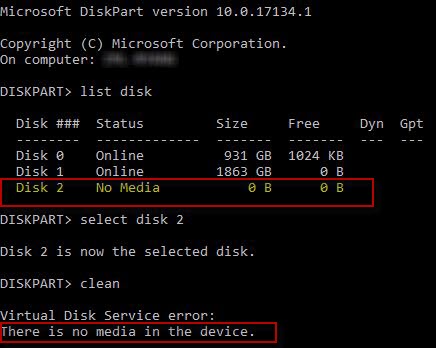 Diskpart reported disk 2 no media
'Disk 1 No Media' may also reads 'Disk 1 Removable No Media' that is listed under the photo displaying what it looks like in disk management.
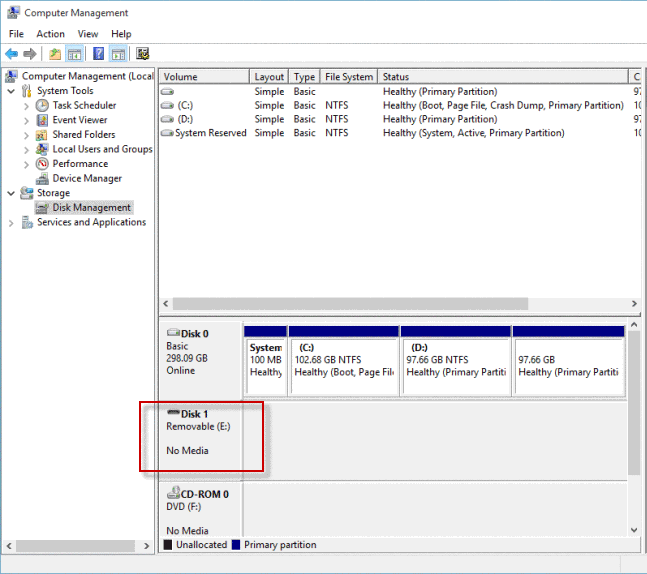 Disk 1 no media
Also read: usb disk no media in disk management error
How to Fix Internal hard drive or external Disk No Media Error using Diskpart Cmd
Preparations: You need to stop using the disk and never try to repair this damaged disk if there were important files inside of the disk/flash drive. A read-only data recovery program will help retrieve data from the disk * no media error before any changes to the disk.
Recommend: recover the data from disk no media (best no media data recovery software)
If it's the internal hard drive that has the no media error, you may unplug it from computer and then connect it to another computer as an external device with a usb cable to fix the no media error.
Step 1: Open cmd by pressing Windows icon + R and type 'diskpart' once the run window shows up
Step 2: Type 'list disk'
Step 3: Type 'select disk *' (there shall be space between disk and *, * shall be replaced by your disk number such as disk 1 or disk 2 or disk 3 that your disk displays in diskpart cmd)
Step 4: Type 'chkdsk/f/r', or you may type 'chkdsk/f/r *' (* is the drive letter of your media in your computer), or you may use "chkdsk i: /f" (i shall be replaced by your own disk drive letter)
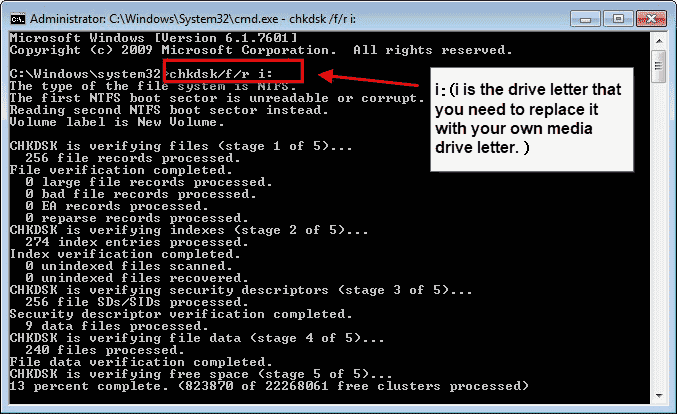 CHKDSK /f/r to repair disk no media 0 bytes with diskpart
See more ways to fix disk no media errors
Fix Damaged Disk No Media 0 Bytes with Repair Tool
Here is an efficient way for repairing the damaged disk with the Windows self-built tool that can be found in Tools options. Here comes the route for this tool.
'This PC' -> Right click usb drive/disk -> Property -> Tools -> Error Checking tool to fix usb no media
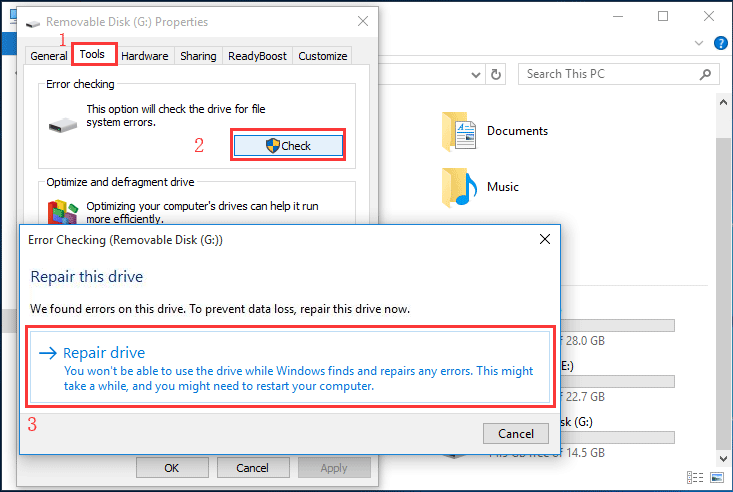 Repair hard disk no media error in Windows 10 with error-checking tool
More fixes: Fix disk no media error in 5 free ways
Not working? Try this
How to Fix "Disk No Media" Error by Formatting Using IM-Magic Partition Resizer
The "Disk No Media" error is a common issue that occurs when a computer fails to detect the data on your USB drive, external hard drive, or SD card. This error typically indicates that the drive is inaccessible or that the file system is corrupted. One effective way to resolve this issue is by formatting the disk, which can restore its functionality. A free tool like IM-Magic Partition Resizer makes this process easy.
Here’s how you can fix the "Disk No Media" error by formatting the drive using IM-Magic Partition Resizer:
Step-by-Step Guide:
Step 1: Download and Install IM-Magic Partition Resizer
Step 2: Launch IM-Magic Partition Resizer and Connect Your Drive
Open the software after installation. Connect the drive displaying the "No Media" error (USB stick, external hard drive, SD card) to your computer.
Step 3: Identify the Problematic Drive
In the IM-Magic Partition Resizer interface, the connected drive will appear in the disk management area.
If the drive shows "No Media", it means the partition or file system is unreadable, but the software can still format it.
Step 4: Format the Drive
Right-click on the problematic drive and select "Format Partition".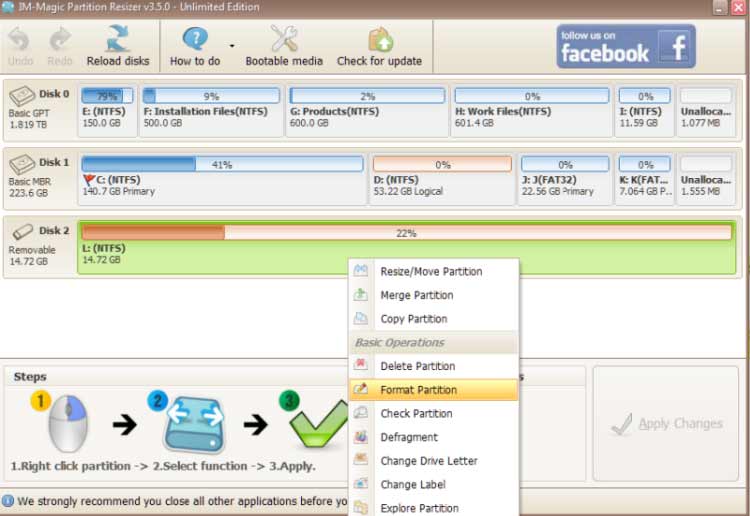
Choose the appropriate file system based on your usage needs.
Step 5: Click "Apply Changes" to proceed with the formatting.
IM-Magic Partition Resizer will begin formatting the drive, which may take a few minutes depending on the size of the disk.
Once completed, the "No Media" error should be resolved, and your disk will be ready for use.
What else can this free tool do? It can also help repair bad sectors with its "Check Partition" feature. If you right-click the damaged disk in the software, the "Check Partition" option will appear. What's more, it also offers free disk cloning, OS migration, and disk management without data loss.
Important Notes:
Backup First: Before formatting, if the drive shows any readable data, try to back it up. Formatting will erase all information on the drive.
Use on Windows: IM-Magic Partition Resizer is compatible with Windows operating systems (Windows 7, 8, 10, and 11).
What is Diskpart and How to Launch It
Some users may be not familiar with diskpart which is an advanced tool in Windows operating systems for advanced users. Who may be called advanced users? Experienced computer users who uses command lines a lot are mostly advanced users.
Can a non-tech geek manage the diskpart in command lines? The answer would be 50% easy to start and 50% hard to manage since it may bump out a lot of some other tough problems when you
- Got a space omitted in the command line
- Puzzled by whether the capital letters shall be applied
- For example, 'select disk 1' is a correct command line, while 'select disk1' order could not be read by computer.
How to Launch Diskpart in Windows 10
You need to press Windows icon + R on your keyboard in Windows 10 to start the run window and type diskpart in the column to get diskpart launched.
Or you may try the following in Windows XP to open cmd diskpart
- Click Start.
- Click Run.
- Type cmd.
- Press Enter or click OK.
- At the Command Prompt window, type diskpart.
- Press Enter.
Last updated on Aug 22, 2025