External Hard Disk Showing 0 byte Space [6 Fixes]
"My external hard disk shows 0 byte space and is not accessible on my PC. This external hard disk should have had 2TB capacity with more than 1TB free space, but I do not know why it only shows 0 byte space. What can I do to make the external hard disk show all previous data?"
Quick Navi
Part 1: How to fix hdd/ssd 0 bytes when there are important data
Data recovery is required when External HDD or computer hard drive says 0 byte in disk space if there were important files inside the disk.
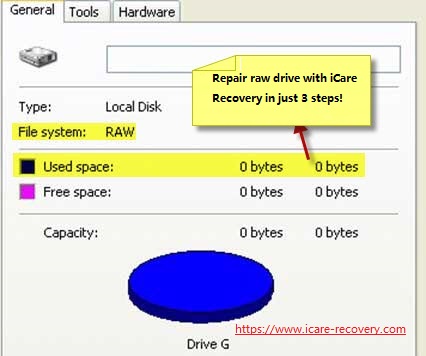
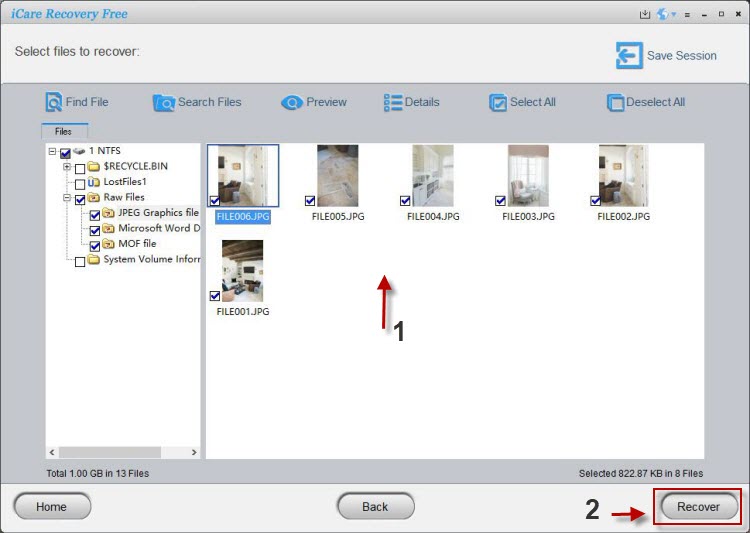
iCare Data Recovery Free is a read-only free data recovery tool, with which you are able to deep scan the external hard disk which changes to RAW format and has 0 byte space. This software will help search every lost file in batch without hurting the external HDD or previous inaccessible data.
![]()
Step1. Download and install iCare Data Recovery on Windows PC. Run the software and choose a proper scan mode.
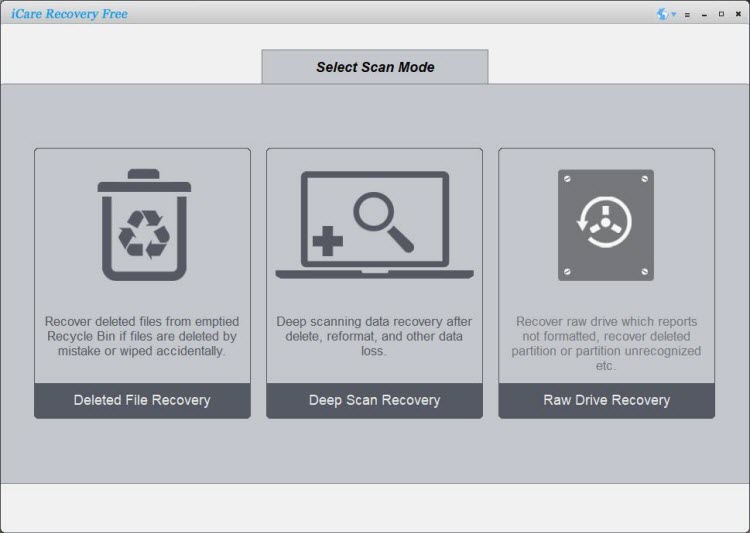
Step2. Select the external hard disk and then the software will deep scan it to search lost files.
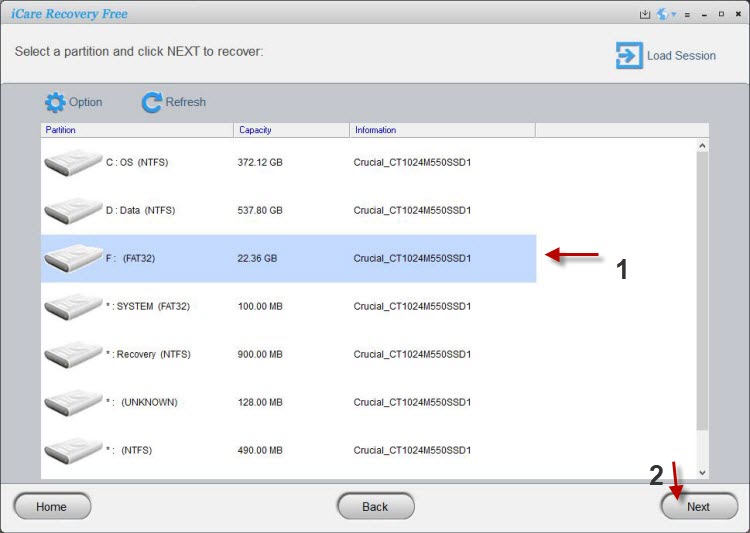
Step3. You can preview found files after scanning and then save the lost data to another drive.
When hard disk shows 0 byte or turns RAW, iCare Data Recovery is able to deep scan a RAW device to search inaccessible files on the external hard disk. Once the recovery is completed, you may do the following repairings.
Part2: 6 ways to repair damaged disk turning 0 bytes
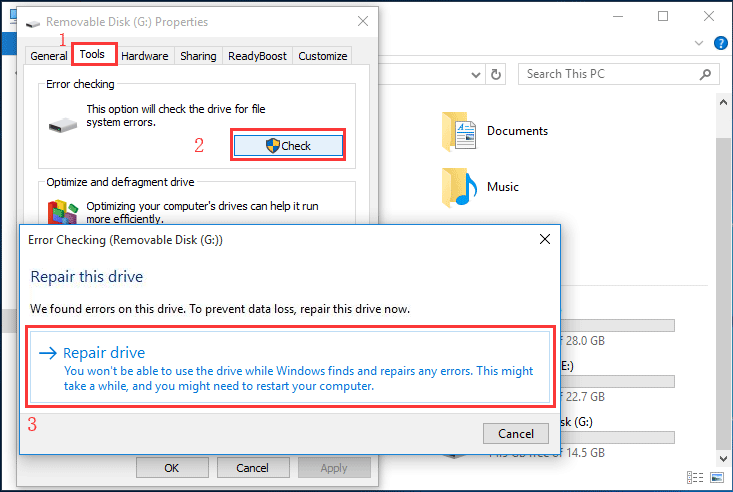
#1 Check the disk file system using error-checking in Windows
If you're encountering a disk that shows 0 bytes in Windows, you can follow these steps to run error-checking and attempt to fix the issue:
-
Press the Windows key on your keyboard and type "This PC." Open the "This PC" or "My Computer" (depending on your Windows version) from the search results.
-
Right-click on the disk that is showing 0 bytes and select "Properties" from the context menu.
-
In the properties window, navigate to the "Tools" tab.
-
Under the "Error checking" section, click on the "Check" button.
-
If prompted, select the option to "Scan drive" or "Check disk for errors."
-
Windows will start scanning the disk for errors and attempt to fix them. This process may take some time depending on the size and condition of the disk.
-
Once the error-checking process is complete, you will be presented with a summary of the scan results. If any errors were found and fixed, Windows will notify you.
-
Restart your computer to apply any repairs that were made during the error-checking process.
After the restart, check if the disk is now showing the correct size and if the issue with 0 bytes is resolved. If the problem persists, it's possible that the disk has a more severe issue or physical damage. In such cases, it is recommended to seek professional help or consider replacing the disk if necessary.
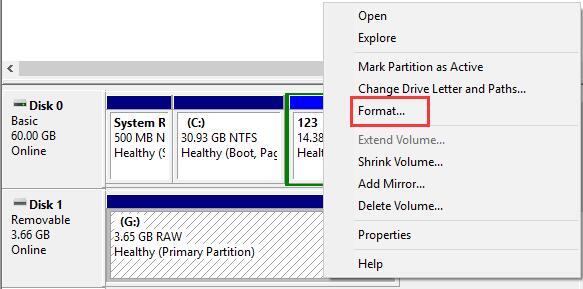
#2 Format Disk that shows 0 bytes or raw
When encountering a disk with a 0 bytes error, formatting the disk can be a potential solution. Here are four ways to format such a disk:
-
Windows Disk Management: Press the Windows key, type "Disk Management," and open the "Create and format hard disk partitions" utility. Locate the disk with 0 bytes, right-click on its partition, and select "Format." Follow the on-screen instructions to complete the formatting process.
-
Command Prompt: Open an elevated Command Prompt by right-clicking the Start button and selecting "Command Prompt (Admin)" or "Windows PowerShell (Admin)." Type the command format X: (replace "X" with the drive letter of the disk showing 0 bytes) and press Enter. Confirm the formatting process when prompted.
-
Third-Party Disk Management Tools: Utilize third-party disk management tools such as IM-Magic Partition Resizer Free, EaseUS Partition Master, MiniTool Partition Wizard, or AOMEI Partition Assistant. These tools provide comprehensive disk management features, including disk formatting. Download and install the preferred tool, select the disk with the 0 bytes error, and follow the software's instructions to format the disk.
-
Bootable USB or CD/DVD: Create a bootable USB or CD/DVD using tools like Rufus or Windows Media Creation Tool. Boot your computer from the created media and choose the option to format the disk during the installation process. Be cautious as this method erases all data on the disk.
Before formatting, ensure you have backed up any important data from the disk, as formatting permanently deletes all existing data. Additionally, if the disk continues to display the 0 bytes error after formatting attempts, it might indicate a hardware malfunction or severe issue that requires professional assistance or disk replacement.
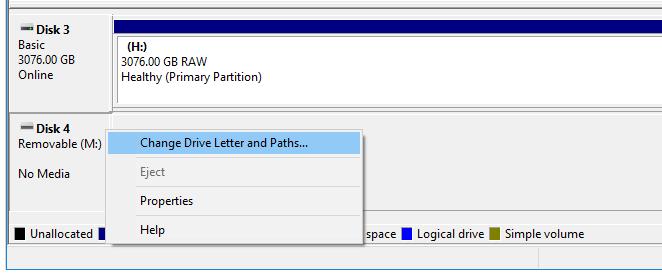
#3 Change a drive letter for the disk that shows 0 bytes
To change the drive letter for a disk that shows 0 bytes, you can follow these steps:
-
Press the Windows key on your keyboard and type "Disk Management." Open the "Create and format hard disk partitions" or "Disk Management" (depending on your Windows version) from the search results.
-
In the Disk Management window, locate the disk that shows 0 bytes. It will be listed with a label such as "Disk 0," "Disk 1," etc. Ensure you identify the correct disk.
-
Right-click on the partition of the disk (it will be displayed as "Unallocated" or with an incorrect drive letter) and select "Change Drive Letter and Paths" from the context menu.
-
In the Change Drive Letter and Paths window, click on the "Change" button.
-
In the next window, select a new, available drive letter from the drop-down menu.
-
Click "OK" to confirm the drive letter change. A warning message may appear if the drive letter is already assigned to another disk or partition. In such cases, choose a different available drive letter.
-
Close the Disk Management window.
The drive letter for the disk has now been changed. Check if the disk is now displaying the correct size and if the issue with 0 bytes is resolved. If the problem persists, there may be other underlying issues with the disk that require further investigation or professional assistance.
#4 Repair disk 0 bytes using chkdsk cmd
To repair a disk showing 0 bytes using the chkdsk command in Windows, you can follow these steps:
-
Press the Windows key on your keyboard and type "Command Prompt." Right-click on "Command Prompt" in the search results and select "Run as administrator" to open an elevated Command Prompt.
-
In the Command Prompt window, type the following command and press Enter:
chkdsk X: /f
Replace "X" with the drive letter of the disk showing 0 bytes. For example, if the disk is labeled as "h:", the command would be chkdsk h: /f.
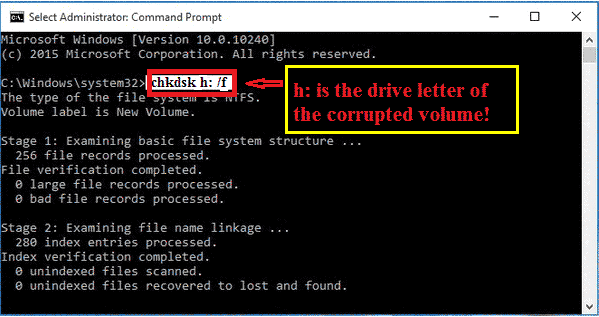
The /f parameter instructs chkdsk to fix any errors it finds on the disk.
-
If the disk is in use and cannot be dismounted, the Command Prompt will prompt you to schedule a disk check for the next restart. Type Y and press Enter.
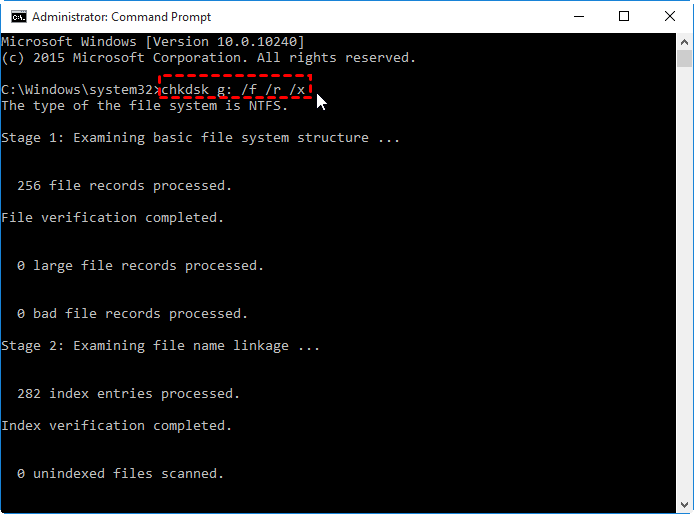
Or you may try the following cmd which can repair disk too. 'chkdsk g: /f /r /x' when the disk shows as drive g that you need to replace it with your own disk drive letter.
If the disk has no drive letter on your computer, but only the disk number, you may use the following cmd.
- list disk
- select disk * (here replace * with your disk number, such as when your disk shows as 1, here type 'select disk 1'), and then type enter
- chkdsk /f /r /x, and then type enter
- Once it finished repairing the disk, type exit and then press enter to close the cmd.
-
Close the Command Prompt window and restart your computer.
-
During the restart, Windows will perform the disk check and attempt to repair any errors on the disk.
-
Once the disk check is complete, Windows will load normally.
After the restart, check if the disk is now displaying the correct size and if the issue with 0 bytes is resolved. If the problem persists, it's possible that the disk has a more severe issue or physical damage.
#5 Change a usb disk cable or change another pc to try to determine the error
To determine whether the error is due to the USB disk or the computer, you can follow these steps:
-
Change the USB disk cable: Sometimes, a faulty or damaged USB cable can cause issues. Try using a different USB cable to connect the disk to the computer. Ensure the cable is in good condition and properly connected at both ends.
-
Connect the USB disk to another PC: If changing the cable doesn't resolve the issue, connect the USB disk to another computer. Use a different PC to see if it recognizes the disk properly. This step helps determine if the problem is specific to the original computer.
-
If the USB disk works fine on the other PC, it suggests that the issue lies with the original computer. There may be driver issues, USB port problems, or other software-related factors causing the error.
-
If the USB disk still shows the same error on the other PC, it indicates that the USB disk itself may be faulty. There could be hardware issues with the disk, such as a malfunctioning controller or storage component.
-
By changing the USB cable and connecting the USB disk to another PC, you can isolate the potential source of the problem. If the issue is related to the computer, troubleshooting the USB ports, drivers, or software settings may be necessary. On the other hand, if the USB disk exhibits the same error on multiple computers, it's likely a problem with the disk itself, and professional assistance or disk replacement may be required.
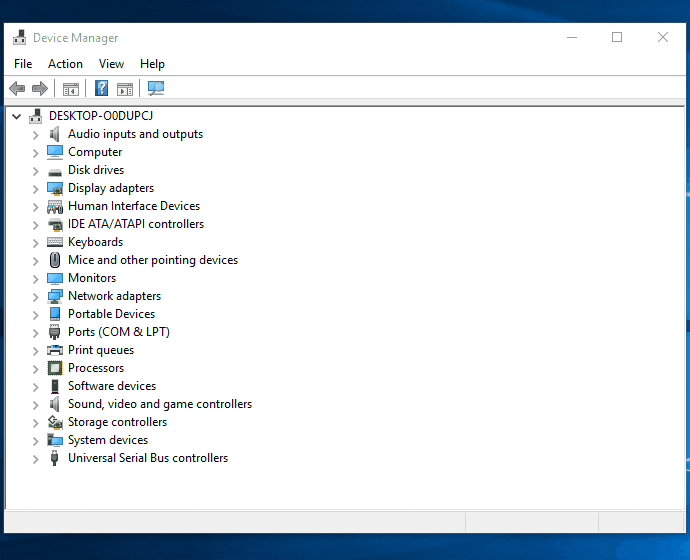
#6 Update disk driver in Windows
To update the disk driver in Windows when a disk shows 0 bytes, you can follow these steps:
- Press the Windows key + X and select "Device Manager" from the menu.
- In Device Manager, expand the "Disk drives" category.
- Right-click on the disk showing 0 bytes and select "Update driver" from the context menu.
- Choose the option to automatically search for updated driver software.
- Windows will search for the latest driver online and install it if available.
- After the driver update, restart your computer.
Updating the disk driver can help resolve compatibility or driver-related issues that might be causing the disk to show 0 bytes.
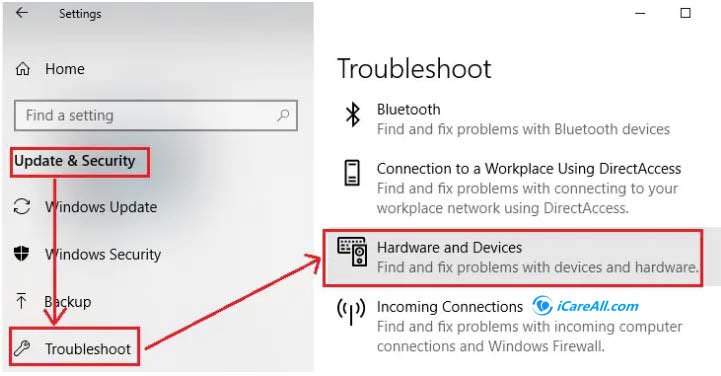
#7 Run Windows Troubleshoot to fix disk 0mb problem
FAQs
#1, What caused disk 0 byte files
There can be several causes for a disk showing 0 byte files. Some common causes include:
- File system corruption: Issues with the file system structure can cause files to be reported as 0 bytes.
- Malware or virus infections: Malicious software can corrupt files and make them appear as 0 bytes.
- Disk errors: Physical or logical disk errors can lead to file corruption and result in 0 byte files.
- Sudden power loss or improper system shutdown: Abrupt power loss or improper shutdowns can cause data loss and file corruption.
- Faulty hardware: Issues with the disk drive or its components can result in incorrect file size reporting.
- Software bugs or glitches: Software bugs or glitches in operating systems or applications can cause file size inaccuracies.
Identifying the exact cause requires further investigation, such as running disk diagnostics, performing malware scans, or checking the file system integrity.
#2, Hard drive shows 0 bytes in diskpart fixes
When a hard drive shows 0 bytes in DiskPart, it indicates a critical issue with the drive. Here are some potential fixes you can try:
- Clean disk: In DiskPart, run the command "clean" to remove all partitions and data from the disk. This will erase all existing data, so make sure to back up important files before proceeding.
- Rebuild MBR and Boot Sector: Use the command "bootrec /fixmbr" and "bootrec /fixboot" in the Command Prompt to rebuild the Master Boot Record (MBR) and boot sector.
- Check disk health: Use disk diagnostic tools like CHKDSK to scan the disk for errors and repair them if possible. In Command Prompt, run "chkdsk X: /f" (replace X with the drive letter of the affected disk).
- Update disk drivers: Ensure that you have the latest drivers for your disk controller. Visit the manufacturer's website or use Device Manager to update the drivers.
- Test in another computer: Connect the hard drive to a different computer and check if it recognizes the disk properly. If it works correctly on another system, the issue may lie with the original computer.
- Data recovery software: If none of the above steps work, consider using data recovery software to retrieve important files from the disk before attempting any further fixes.
If the drive still shows 0 bytes after trying these fixes, it could indicate a hardware failure. In such cases, it is advisable to consult a professional data recovery service or consider replacing the hard drive.
#3, ssd, hard drive shows 0 bytes in bios fixes
Video - how to fix disk shows 0mb when installing Windows
Video: how to rebuild MBR in Windows 10 for damaged disk
Also read: how to fix disk 0 bytes unallocated
When an SSD or hard drive shows 0 bytes in the BIOS, it indicates a severe issue with the storage device. Here are some potential fixes you can try:
- Check cable connections: Ensure that the SATA or power cables connecting the SSD or hard drive to the motherboard are securely connected. Try disconnecting and reconnecting the cables to eliminate any loose connections.
- Update BIOS: Update the motherboard's BIOS firmware to the latest version provided by the manufacturer. Sometimes, outdated BIOS can cause compatibility issues with the storage device.
- Try different ports: Connect the SSD or hard drive to different SATA ports on the motherboard. It helps determine if the issue is specific to a particular port or if it affects all ports.
- Check disk health: Use disk diagnostic tools like CHKDSK or specialized SSD diagnostic tools to scan the storage device for errors. In Command Prompt, run "chkdsk X: /f" for hard drives or refer to the manufacturer's software for SSD diagnostics.
- Test in another computer: Connect the SSD or hard drive to a different computer and check if it recognizes the disk properly. If it does, the issue may lie with the original computer's hardware or BIOS settings.
#4 new ssd showing 0 mb unallocated, how to initialize new disk?
If you have recently installed a new SSD (Solid State Drive) and it is showing 0 bytes, it could indicate a problem with the drive or the way it is being recognized by your computer. Here are a few troubleshooting steps you can try:
- Check the physical connections: Make sure that the SSD is properly connected to your computer. Ensure that the SATA or NVMe cable is securely plugged into both the SSD and the motherboard or interface card.
- Verify BIOS/UEFI settings: Restart your computer and access the BIOS or UEFI settings. Confirm that the SSD is detected and listed correctly. If it's not recognized, check for any available firmware updates for your motherboard or interface card.
- Initialize the SSD: If the SSD is detected but not initialized, you may need to initialize it manually. To do this, you can access the Disk Management utility in Windows or Disk Utility on macOS. Look for the uninitialized SSD and follow the on-screen prompts to initialize and format it.
- Update SSD firmware: Visit the manufacturer's website for your SSD model and check if there are any firmware updates available. Updating the firmware can sometimes resolve compatibility issues and improve drive performance.
- Try a different SATA/NVMe port or cable: If possible, connect the SSD to a different SATA or NVMe port on your motherboard. You can also try using a different cable to rule out any issues with the port or cable.
- Test the SSD on another system: If you have access to another computer, try connecting the SSD to that system to see if it is recognized and displays the correct capacity. This can help determine if the issue is with the SSD itself or your computer's configuration.
- Contact manufacturer support: If none of the above steps resolve the issue, it's recommended to reach out to the manufacturer's support team for further assistance. They can provide specific troubleshooting steps or guide you through the warranty process if the SSD is defective.
Remember to backup any important data before attempting any troubleshooting steps, as some procedures may involve formatting or initializing the SSD, which can result in data loss.
Here are some other queries that users may have the same problem:
- hard disk shows 0 bytes, cannot open
- hard disk 0mb repair, how do I fix 0 bytes on my external hard drive?
- hard drive shows 0 bytes in diskpart
- how to fix hdd sector 0?
- how do I get rid of 0kb virus? -> 0KB may show the files were hidden by virus that you may unhide the folder or files by this guide.
Last updated on Nov 28, 2023
Related Articles