How to Recover Deleted Partition or Recover File from DELETED/LOST Partition
Deleted partition by mistake? Unexpectedly clicking the wrong button or experiencing a power outage can potentially lead to the problem of complete partition loss. Is there a way to recover it? The good news is that there is a solution that can recover deleted partitions and data inside.
Content Navi
- Recover files from deleted volume (partition deleted by mistake, drive inaccessible)
- Recover deleted volume, recover old MBR
- Disk not available, no device, raw, and other damages
Part1: Recover Files from the Deleted Partition
3 Steps to undelete partition to recover lost files with the free undelete software:
![]()
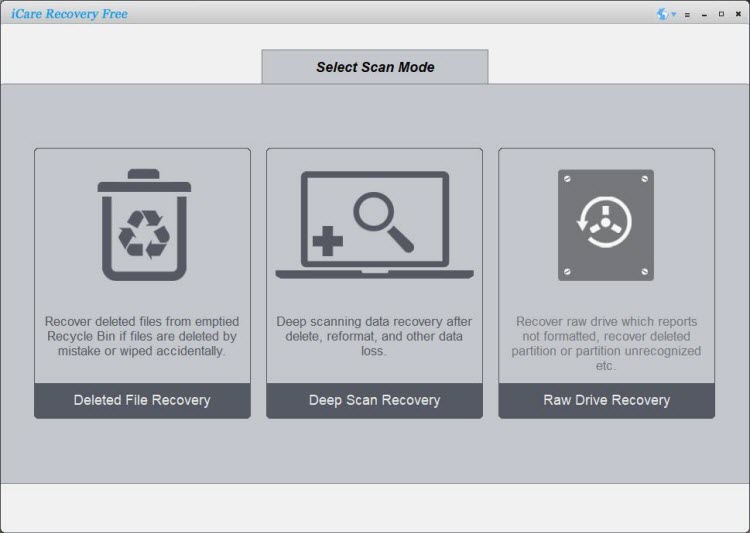
Step1. Download and install iCare Data Recovery on your PC. Launch the software and select a recovery module “RAW DRIVE RECOVERY”.
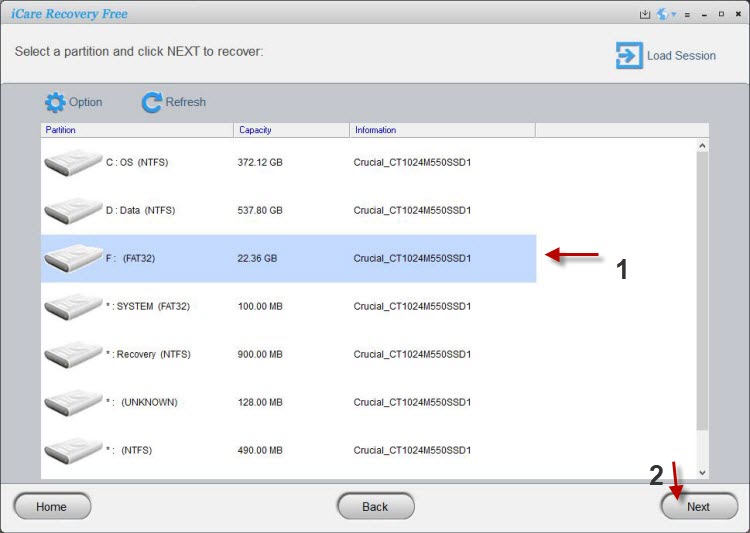
 Step2. Choose the device for scanning and then you just need to wait before the scanning is over.
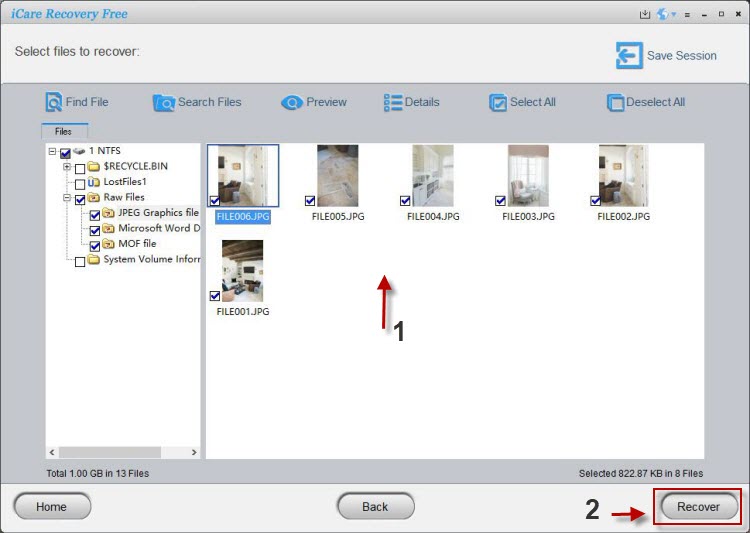
 Step3. Then, you can select the files you want to recover and save them onto another disk.
Part2 Recover deleted partition with TestDisk
TestDisk is a free and open-source recovery software. It is designed to help recover lost partitions and repair damaged disk structures. Here's a general guide on how to use TestDisk to recover a deleted partition:
Video: how to recover deleted partition using TestDisk
-
Download and install TestDisk: Visit the official TestDisk website (https://www.cgsecurity.org/wiki/TestDisk_Download) and download the appropriate version for your operating system.
-
Launch TestDisk: Run the TestDisk executable file to start the program.
-
Select the disk: TestDisk will display a list of available disks. Choose the disk that had the deleted partition and press Enter.
-
Choose the partition table type: TestDisk will prompt you to select the type of partition table. If you're unsure, you can choose the default option, which is usually "Intel."
-
Analyze the disk: TestDisk will analyze the disk and display its current partition structure, as well as any deleted partitions it detects.
-
Select the deleted partition: If TestDisk detects the deleted partition, it will be listed. Use the arrow keys to highlight the deleted partition and press "P" to preview the files in it. This step helps verify that the deleted partition is the one you want to recover.
-
Recover the partition: After verifying the deleted partition, use the arrow keys to select it and press "Enter." TestDisk will prompt you to choose the partition type. If you're not sure, you can choose the default option, which is usually "Primary." Confirm your selection, and TestDisk will attempt to recover the deleted partition.
-
Write the recovered partition table: If TestDisk successfully recovers the deleted partition, it will display a confirmation message. Select "Write" and confirm your choice. This action will write the recovered partition table to the disk.
-
Restart your computer: After writing the recovered partition table, restart your computer to apply the changes.
It's important to note that data recovery can be a complex process, and there's no guarantee of success. Additionally, it's advisable to create a backup of your important data before attempting any recovery operation.
Part3: Disk damaged, no device, raw, not available, not recognized by PC
Scenario: Disk unknown, no media, no drive letter fixes
Also read: hard disk unknown inaccessible
When dealing with a damaged disk exhibiting symptoms like "no device," "raw," "not available," or "not recognized," it's essential to distinguish between logical damages, which are reparable, and physical damages, which are often irreparable.
Logical Damages:
Logical damages refer to issues related to the software, file system, or partition table rather than physical problems with the disk's hardware. Here are potential fixes for logical damages:
-
Data Recovery Software: Utilize data recovery software to scan and retrieve files from a damaged disk. Software like iCare Recovery Free can help recover data even from a disk with logical issues.
-
File System Repair: Use built-in tools or third-party utilities to repair the file system. For Windows, the chkdsk command can attempt to fix logical errors. On macOS, you can use Disk Utility, and on Linux, tools like fsck can help.
-
Partition Recovery: If the partition table is damaged, tools like TestDisk (free) or EaseUS Partition Master (commercial) can assist in recovering lost or damaged partitions.
Physical Damages:
Physical damages involve issues with the disk's hardware components and are often more challenging to fix. Here are considerations for physical damages:
-
Professional Data Recovery Services: If the disk has suffered physical damage, seeking professional data recovery services is advisable. These specialists have cleanroom environments and specialized tools to handle physical repairs.
-
Disk Replacement: In cases of severe physical damage, replacing the damaged disk with a new one may be necessary. Ensure you have backups to restore your data to the new disk.
-
Check Connections and Cables: Sometimes, apparent physical damages may be due to loose connections or faulty cables. Ensure that all connections are secure and use different cables to rule out this possibility.
-
Avoid DIY Repairs: Attempting to repair physically damaged disks without the proper expertise can worsen the situation. Avoid opening the disk casing or tampering with internal components unless you are a qualified professional.
In conclusion, while logical damages can often be repaired using various software tools and techniques, physical damages may require professional intervention. It's crucial to diagnose the nature of the damage accurately before attempting any fixes, and for critical data, seeking professional help is recommended. Regular backups can also mitigate the impact of potential disk failures.
Other Questions
- Will delete partition remove data on the partition? -> Yes, but data can be restored by free tool iCare Recovery before they were totally overwritten
- How to delete all partitions on a disk and repartition?
#1 Will delete partition delete files on the partition?
Yes, deleting a partition will generally result in the loss of all the files and data stored within that partition. When you delete a partition, the file system information and directory structure associated with that partition are removed, making the files inaccessible. However, the actual data may still remain on the disk until it is overwritten by new data.
If you accidentally delete a partition and want to recover the files within it, it is crucial to avoid any further read/write operations on the affected disk or partition. This helps minimize the risk of overwriting the deleted data and improves the chances of successful recovery.
In such cases, using free data recovery tools like iCare Data Recovery or TestDisk may help you recover the deleted partition and restore access to your files. However, the success of the recovery process depends on various factors, including the specific circumstances of the deletion and subsequent disk activity.
Remember to always exercise caution and consider seeking professional assistance if you are unsure about performing data recovery operations yourself, or if the data is of critical importance.
#2 How to delete all partitions on a disk and repartition disk?
Part1: CMD to delete all partitions on a disk (non os disk)
To delete all partitions on a non-OS disk using the Command Prompt in Windows, you can follow these steps:
-
Press the Windows key + R on your keyboard to open the Run dialog box.
-
Type "cmd" and press Enter to open the Command Prompt.
-
In the Command Prompt window, type the following command and press Enter to open the Diskpart utility:
diskpart -
A new Command Prompt window titled "Diskpart" will open. In this window, type the following command and press Enter to list all the disks on your system:
list disk -
Identify the disk number of the non-OS disk on which you want to delete partitions. Take note of the corresponding disk number.
-
Type the following command and press Enter to select the disk:
select disk [disk number]
Replace [disk number] with the actual disk number of the non-OS disk you want to work with.
-
Type the following command and press Enter to list all the partitions on the selected disk:
list partition
-
Verify that the listed partitions are the ones you want to delete. Be absolutely sure before proceeding, as this action is not reversible and will result in data loss.
-
Type the following command and press Enter to delete each partition one by one:
select partition [partition number] delete partition
Replace [partition number] with the actual partition number of the partition you want to delete. Repeat this command for each partition you wish to remove.
-
Once you have deleted all the desired partitions, you can exit the Diskpart utility by typing:
exit
Be extremely careful when using Diskpart and make sure you select the correct disk and partitions for deletion. Double-checking the disk and partition numbers is crucial to avoid accidentally deleting the wrong data.
Part2: Free tool to delete all partitions
To delete all partitions on a disk using IM-Magic Partition Resizer Free, you can follow these steps:
-
Download and install IM-Magic Partition Resizer Free: Visit the official website of IM-Magic Partition Resizer Free (https://www.resize-c.com/) and download the software. Follow the installation instructions to install it on your system.
-
Launch IM-Magic Partition Resizer Free: Run the IM-Magic Partition Resizer Free application after installation.
-
Select the disk: From the list of available disks, choose the disk on which you want to delete all partitions. Make sure you select the correct disk, as the operation is irreversible and will result in data loss.
-
Check for existing partitions: Before deleting the partitions, it's essential to check the current partition layout on the selected disk. IM-Magic Partition Resizer Free provides a visual representation of the partitions on the disk, including their sizes and labels. Verify that you are selecting the correct disk with the desired partitions.
-
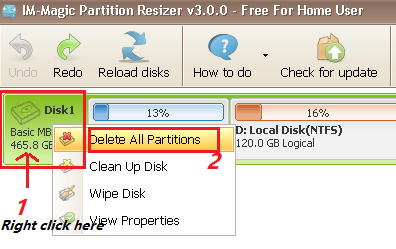
Delete partitions one by one or all at one: IM-Magic Partition Resizer Free allows you to delete partitions individually as well as deleting them all at once. To delete a partition, select it from the list of partitions displayed by the software. Right-click on the selected partition and choose the "Delete Partition" option from the context menu. Confirm the deletion when prompted. To delete all partitions at once, you may click the disk icon in the software, and then it will show you an option DELETE ALL PARTITIONS.
-
Repeat the deletion process: Once you delete a partition, repeat the process for the remaining partitions until all partitions on the disk have been removed.
-
Apply the changes: After deleting all the partitions, you need to apply the changes to make them take effect. Look for an "Apply" or "Commit" button in the IM-Magic Partition Resizer Free interface. Click on it to start the process of deleting the selected partitions. Confirm any further prompts or warnings.
Please note that deleting partitions using IM-Magic Partition Resizer Free will result in data loss. Ensure that you have backed up any important data before proceeding. Exercise caution and carefully follow the software's instructions to avoid unintended data loss or damaging your disk's partition structure.
Always refer to the software's documentation or help menu for specific instructions related to deleting partitions if you encounter any difficulties during the process.
How to repartition a hard drive after deleting all partitions
To repartition a hard drive after deleting all partitions, you can follow these steps:
Note: Repartitioning a hard drive will erase all data on it, so make sure to back up any important files before proceeding.
-
Open the Disk Management tool:
- Press Windows Key + R to open the Run dialog box.
- Type "diskmgmt.msc" (without quotes) and press Enter.
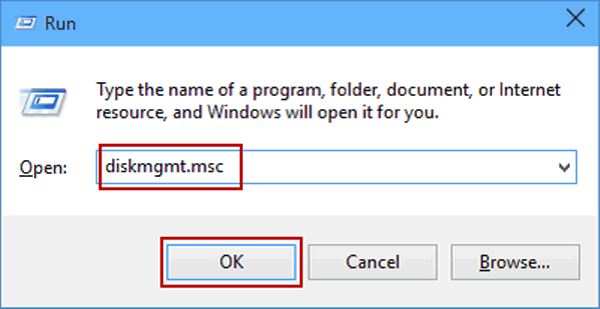
- The Disk Management window will open, displaying all the connected drives.
-
Locate the hard drive you want to repartition:
- In the Disk Management window, look for the disk you want to repartition.
- It will be listed as Disk 0, Disk 1, etc., and will display the size of the disk.
-
Delete existing partitions:
- Right-click on each partition on the disk and select "Delete Volume" or "Delete Partition."
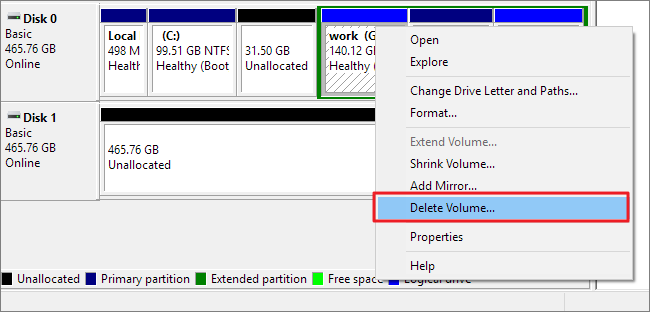
- Confirm the deletion when prompted.
- Right-click on each partition on the disk and select "Delete Volume" or "Delete Partition."
-
Create new partitions:
- Right-click on the unallocated space on the disk and select "New Simple Volume."
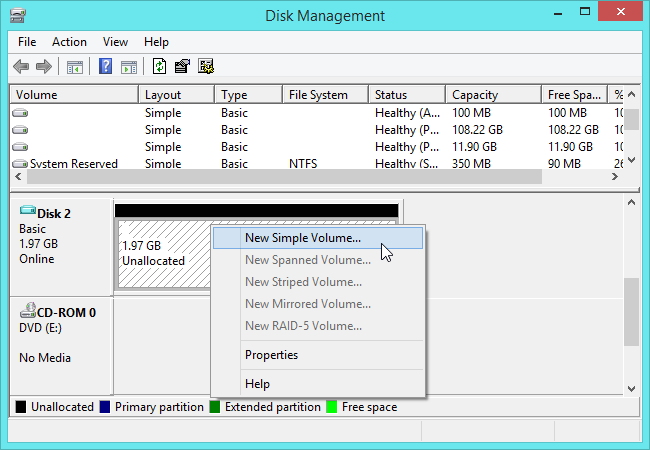
- The New Simple Volume Wizard will open. Click "Next."
- Right-click on the unallocated space on the disk and select "New Simple Volume."
-
Specify partition size:
- Enter the size for the new partition in megabytes (MB) or accept the default size.
- Click "Next."
-
Assign drive letter or mount point:
- Choose a drive letter or mount point for the new partition.
- Click "Next."
-
Format the partition:
- Select a file system (e.g., NTFS) for the partition.
- You can also provide a volume label (name) for the partition.
- Check the "Perform a quick format" option.
- Click "Next" and then click "Finish" to create the new partition.
-
Repeat steps 4-7 if you want to create additional partitions on the remaining unallocated space.
-
After creating all the desired partitions, close the Disk Management tool.
Please note that the exact steps may vary slightly depending on your operating system version, but the general process should be similar. Always double-check the actions you're performing to avoid accidentally modifying the wrong drive or deleting important data.
Last updated on Nov 28, 2023
Related Articles
- undo format hard disk drive
- Western digital drive file recovery
- Formatted portable hard drive by mistake
- accidentally formatted drive
- Formatted disk data recovery